OCA in Blender
OCA is an open format to ease the exchange of traditionnal/frame-by-frame/cel animation between different applications. e.g. you can now import a 2D animation made in Krita in Blender, keeping all the layers, the keyframes, etc.
With this add-on, you can import the OCA Format in Blender.
It is able to import all animation keyframes from an OCA document, keeping the layer structure, and a lot of other information.
The documentation about OCA is available on oca-docs.rainboxlab.org.
Features
This OCA importer will import the most common features of all drawing/animation software:
- Import the layers as planes
- Layer groups as Collections and a parent empty
- Layer labels as viewport display color
- Layer visibility
- Keyframes as animated textures
- Opacity keyframes
- Layer sizes and coordinates only for non-animated layers
- Document background color as a background plane
Note
To import animated layers, they must be exported as document size and not keeping the layer size.
Options
Top bar ‣ File Menu ‣ Import ‣ OCA as Duik 2D scene

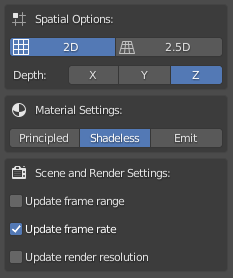
You can change a few options when importing your OCA file:
2D/2.5Dwill set the camera as orthogonal or perspective. In the future, this option will also change how depth is handled.Depth axislets you choose which axis is facing the depth of the scene.Material Settingslets you change the way the shading is handled on the planes.Scene and Render settingslets you update the scene settings to match the incoming animation.
Shading
- Principled is a standard shader.
- Shadeless renders the layer as it is, without taking any light and without having any influence in the scene and indirect illumination.
- Emit uses an emission shader, and, in Cycles, the other objects will get the color of the layer. In Eevee it is the same as shadeless.
Keyframes and opacity
Layer animation (i.e. keyframes) are imported as animated textures, using the Texture Animation module.
Opacity keyframes are imported on a Math node in the shader which multiplies the alpha of the image. Opacity keyframe interpolation is set to constant by default.
Use
The add-on will set your 2D scene up automatically, and adds a camera to view it.

In the item parameters, when an imported layer is selected, you can easily move the layer along the depth axis using the Depth value in the Duik Layer Controls group.